Swimming Pool Construction
Our Pool Construction Process
Step 1 Plans and Permits

You have signed a contract and you have been given a tentative start date! We will now generate the construction plans for each step. We will also acquire the necessary permits to begin the construction process. Once we have all the necessary permits, we will call 811 to locate all existing utility lines before the beginning of construction. This is important because it will avoid any unknown obstacles that we may encounter.
Step 2 Pool Layout

Once the plans are approved and the permits have been obtained, construction begins! Our team will now measure out accurately where the pool will sit in your yard. After we pull all the correct measurements it is now time to form the pool . The form boards are set with great care to ensure your pool is in the correct position.
Step 3 Excavation
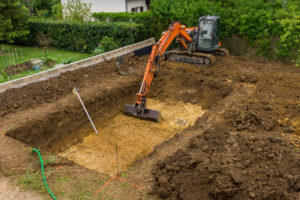
After the form is set, the excavation may begin. An excavation crew will carefully dig your pool in accordance with your exact pool design, depth, and elevation. Though it may just look like one big hole in the ground, it is the beginning of your dream pool!
Step 4 Plumbing
Rough plumbing is done immediately following steel installation. Pipes are set up to run towards the equipment pad which then will hook up to the pool equipment. The pipes are installed for main drains, skimmers, light niches, return line stubs and pre-plumbing of raised spas.
Step 5 Steel Construction

Next, the steel crew will reinforce the pool shell with #3 and #4 rebar that is carefully placed horizontally and vertically. This creates the backbone of your swimming pool and allows the pool to stay in the correct shape.
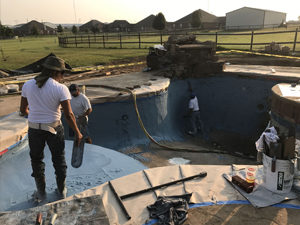
Step 6 Gunite
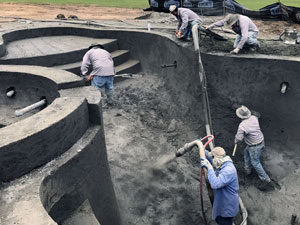
The next process of your pool construction is the application of gunite. Gunite is a mixture of sand, rock, and cement that will be applied by an experienced technician. We choose to use gunite because we want to ensure you are getting the most out of your investment. Gunite will allow the pool to keep its shape for several years and may only require minor fixes in the future. The gunite is applied through a hose with highly pressurized air to achieve the desired psi to provide maximum structural strength. Our gunite professionals ensure that everything is done very precisely.
Step 7 Tile And Coping
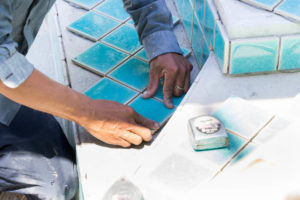
After contract signing, a materials selection list is sent out to you. This list provides the information of the professionals that we work with that will work with you in picking out the best tile and coping that will suit your needs and wants. The tile of your choice is hand laid and grouted around the water line, as well as other places of the pool that you have specified such as around a raised spa or a raised decorative wall. After the tile is laid, the coping of your choice is then hand laid and grouted on the wall top. Coping is the material that outlines your pool, this could be flagstone, travertine, concrete, etc.
Step 8 Equipment and Utilities Setup
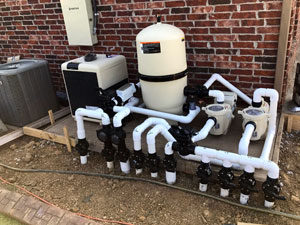
An experienced technician will plumb in all of the necessary equipment for the pool, including water feature pumps and other optional equipment. A licensed electrician will install the breaker box and run electrical conduits for pool lights and pool equipment. Gas lines to the pool heater will be run to the equipment location by a licensed utility specialist. We take this step very seriously, because without the correct equipment and setup your pool will not run correctly. Therefore, we double check the work done to ensure that your pool will run just as it is supposed to without complications.
Step 9 Deck Layout and Pour
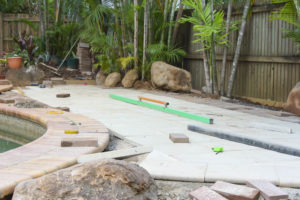
With the material selection list sent, you will also choose a desired decking material. The pool deck should reflect the overall theme for the project including color, pattern, and type. The deck is formed, reinforced with rebar, and poured. The decking is an exciting component because it seems to always bring the whole project together.
Step 10 Site Clean Up
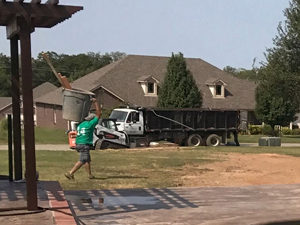
Your pool is nearly complete! We remove any excess waste and construction material and prepare the pool interior to be finished. We also ensure that each step previously has been completed before the final steps.
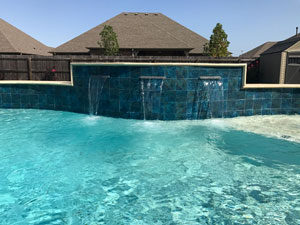
Step 11 Pool Finish
The pool interior is coated with your choice of materials. Our partners will meet with you at the very beginning of the process to show you all the choices you have to choose from. Different finishes render different effects and moods upon the pool water and the overall appearance of the backyard area. Our trusted professionals will come out and apply your finish that was chosen. Once this is finished, we begin filling the pool with water.
Step 12 Start Up and Instruction
Here we will go over all the details of the pool and make sure it is completed, do any necessary touch ups, and double check it is ready to go. Once this is done and the pool is full, a service technician will check to make sure the equipment is installed correctly, and then proceed to start up the equipment. Once the equipment has been started and is fully operational, a service technician will set up a time to meet with you and show you maintenance operations. As it could seem like a new world trying to understand how the pool and the equipment operate, we assure you that everyone is capable of operating it.
Step 13 SWIMMING!
Now that your pool is complete, it’s time to jump in and ENJOY! No more waiting to enjoy those long days soaking up the sun in the pool or enjoying those late night swims under the stars. Your pool is finally more than just one big hole in the ground. We are very thankful you trusted us in creating and building your dream pool. If you have any further questions, comments, or concerns, we are a phone call away! Happy Swimming and thank you again!